Image Editor - Warp Tool
Warping Images
The mesh warp tool allows you to warp an image by moving two imaginary grids laid over the image. Points in the source grid are moved to the corresponding point in the destination grid. For many purposes, you can ignore the source grid, but it comes into its own when morphing between two images.
When you select the warp tool, the destination grid is drawn over the image in green. You can drag grid points around to warp the image. If you drag them outside their neighbours, you will get strange effects, so this is best avoided. You can drag a rectangle around points to select them and then move them all at once.
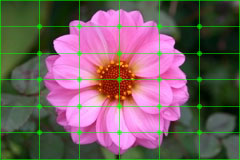
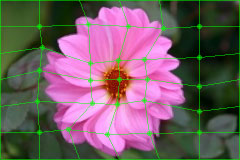
Warping an image using the destination grid only
Controls
To change the resolution of the grid, right-click on a point to display the popup menu. This allows you to add and remove rows and columns.
Controls
The warp tool has two controls, which allow you to turn on display of the source and destination grids.
![]()
Warp Tool Controls
Using the Source Grid
For simple warps, you won't need to use the source grid, but it can be very useful, particularly when morhping between two images. When you move a point in the source grid, you'll find that it has the opposite effect to a point in the destination grid. If you imagine you're trying to morph between two faces, what you would probably do is place grid points on prominent features, such as the eyes, in each grid. Use the source grid for the source face, and the destination grid for the destination face.
Morphing
The warp tool can also morph between two images. If you turn on the "Morph" control, then it will try and morph between the active layer and the layer beneath. The "Time" slider will let you choose how far you are through the morph. While you are setting up the grids, you'll need to be showing and hiding both the grids and the top layer a lot. Set up the source grid first while hiding the top layer, and then set up the destination grid.