Distorting Images
Introduction
Distorting an image involves moving its pixels from one place to another. Java comes with one filter, AffineTransformOp which will distort images, but that's much too tame. We want to do more than just rotate or scale images - we want to ripple, twirl, fold, mangle and staple them This article explains how to distort or warp images in Java using a BufferedImageOp. There's plenty of source code for various effects.
Image Distortion Basics
To distort an image we need to move its pixels from one place to another. Typically we know the mapping from the source image to the destination image, for example if we're scaling an image up by a factor of two, we know that we going to move the pixel at (x,y) to (2x, 2y). Of course, if we did this, we'd end up with holes in the image - in fact, 75% of the image would be missing! What we need to do is find the inverse mapping and go through each pixel in the output image, find the corresponding pixel in the source and copy it. For our example of scaling by a factor of two, we'd take the output pixel at position (x,y) and copy the input pixel at (x/2,y/2) to it. A problem which sometimes crops up is that while the forward mapping may be easy, the inverse mapping may be difficult to find mathematically. It's possible to work round this with lookup tables or approximations, but we'll not worry about this here. Note that we sometimes do need both directions of the mapping - if we're going to make the output image larger than the input to cope with pixels moved off the edges, we need the forward mapping to work out how big to make the output image and the inverse to actually move the pixels.
Interpolation
In our scaling example, what about pixels on odd-numbered positions though? It looks like we need to find pixels at fractional positions in the source image. There are a number of solutions to this. The simple solution is just to round pixel coordinates to the nearest integer. This is called nearest-neighbour interpolation or nearest-neighbour sampling. It's easy, but the results leave something to be desired: What we get are jaggies in the output. What we need to do is interpolate between the pixels on each side of the position we're looking at. Now, there are as many interpolation schemes as there are fish in the sea, but we're only going to talk about two: bilinear and bicubic interpolation. As the name implies, bilinear interpolation involves a linear interpolation between pixels, only in 2 dimensions. We have the pixels at the four corners surrounding the point. First we interpolate across the top and bottom of the square, and then we interpolate between the two values we just calculated, a total of three interpolations. Bicubic interpolation produces a smoother result but at the expense of much more calculation. We have to look two pixels in each direction, thus we have to take many pixels into account. We won't be doing this, although it's possible to modify the filters to do it. I encourage you to experiment.
Edges
Sometimes our distortion mapping will involve trying to fetch pixels which have gone off the edge of the input image. e.g. if we try and rotate an image in place, the corners of the output image don't correspond to any pixels in the input image. There are several things we can do in this situation. For example:
- We can just make any such pixels transparent.
- We can make any such pixels a colour of our choice.
- We can clamp, or fetch the nearest pixel which is actually on the image.
- We can wrap round to the other edge of the image.
- We can wrap, but imagine the image to be reflected at the edges.
The choice of which to do depends on the situation. For image rotation, for example, we'd almost certainly want to make outside pixels transparent. For a rippling effect, we'd use transparent if we wanted to animate a waving flag, but clamping if we just wanted the image to appear to "swim".
TransformFilter
In order to warp images, we'll need some BufferedImageOps and the best way to do this is to put all the common warping code into a common superclass, which we'll call TransformFilter. It has a method which needs to be overridden by subclasses which performs the forward and inverse transformations. It will do bilinear interpolation and has options for different ways of handling edges.
One nasty aspect of transforming images is that in the general case, we may have to fetch pixels from anywhere in the source image, which means that all the pixels have to be available to be fetched. Luckily BufferedImage has a way of accessing the image's pixels as an array of integers - getDataBuffer() which will do the trick. But wait! There's two really big problems with getDataBuffer. The first problem is that we'd have to write code for every type of BufferedImage. The second problem is that calling getDataBuffer causes an image to become hardware-unaccelerated (if there is such a phrase). This causes subsequent drawing operations into the image to be really, really slow. You can read more about this problem here. As we don't know how our warped images are going to be used, we'd better avoid this. It looks like we're going to have to get all the image pixels into a massive array for the general case and again there's a method to do this called getRGB(). But wait! That's no good either as it also causes the image to become unaccelerated. It turns out that calling getRaster().getDataElements()/getPixels() doesn't, however, so we'll use those instead. Unfortunately, we're then back to the problem of having to write different code for every data buffer format. At this point, I throw up my hands, and declare that I'm going to make my filters work best for the most common case: TYPE_INT_ARGB images. Other types may become unaccelerated, but that's tough.
To use TransformFilter, you need to subclass it and override the methods:
        protected abstract void transformInverse(int x, int y, float[] out);
        protected void transformSpace(Rectangle rect);
The first of these should perform the inverse transformation on (x,y) and put the result into out[0] and out[1]. The second (which is optional) modifies the rectangle to give the desired size of the output image. If you miss it out, the output image will be the same size as the input image.
To change edge handling, call:
        public final static int ZERO = 0;
        public final static int CLAMP = 1;
        public final static int WRAP = 2;

        public void setEdgeAction(int edgeAction);
The default edge handling is ZERO.
The Filters
OffsetFilter
This filter translates an image by the amount you specify in the X and Y directions. Pixels which go off the edge are wrapped back onto the opposite edge. The offsets can be positive or negative. This is a handy filter for producing seamless tilings: offset the image and then paint over the cracks. The offsets can be positive or negative.
OffsetFilter in Action
- int XOffset - The X offset in pixels
- int YOffset - The Y offset in pixels
FlipFilter
The FlipFilter does simple reflections and rotations of an image. You can rotate the image by 90, 180 or 270 degrees, flip it horizontally, vertically or about its leading diagonal. This can be useful for producing tiled patterns or variants of game sprites.
FlipFilter, 180° rotation
- int Operation - One of FLIP_H, FLIP_V, FLIP_HV, FLIP_90CW, FLIP_90CCW, FLIP_180
TileFilter
Not really a distortion, but related. TileFilter produces a new image which is a tiled copy of the source image. You specify the size of the output image.
As well as simple tiling, this filter will perform symmetric tilings. You can pass in a 'symmetry matrix' which specifies for each tile whether it should be rotated 180 degrees, flipped, or left alone.
MarbleFilter
MarbleFilter applies a marbling effect to an image, displacing pixels by random amounts. You can change the amount of marbling and a turbulence setting. Turning up the turbulence will give a diffusing effect.
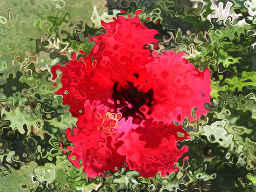
MarbleFilter
- float XScale - The scale of the marbling in the X direction
- float YScale - The scale of the marbling in the Y direction
- float Amount - The amount of the marbling (the twist)
- float Turbulence - How turbulent the effect is
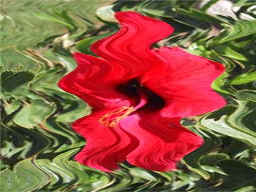
WaterFilter
The WaterFilter will produce a water ripple effect on your image. You can change the wavelength, phase and amplitude of the ripples and turn antialiasing on or off. It's fun to animate the phase of the ripples to get the effect of the ripples moving out from the centre.
WaterFilter
RippleFilter
RippleFilter which will ripple your image horizontally or vertically. You can change the wavelength and amplitude in the horizontal and vertical directions and you can make pixels which go off the edges wrap round if you want. You can also choose the ripple shape from: triangle, sawtooth, sine and Perlin noise.
RippleFilter
TwirlFilter
Once you've rippled your image, why not twirl it as well? TwirlFilter will distort your image by twisting it around the centre. You can change the angle and direction of twist.
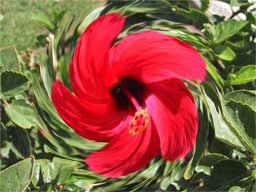
TwirlFilter in Action
- float Angle - The angle of twist, in radians
SphereFilter
SphereFilter applies a fisheye lens type effect to an image. Pixels are displaced according to their distance from the centre of the image.
SphereFilter
WarpFilter
WarpFilter warps an image using a mesh warp algorithm. You supply two warp grids: a source grid and a destination grid. The filter will warp the image so that pixels on source grid points will move to destination grid points. The warp grids are implemented by the class WarpGrid which contains methods for interpolating between grids. This allows you to produce animations of warping by repeatedly using WarpFilter. To make this easier, WarpFilter can be given a number of frames and will produce an image containing tiled frames of a warp from 0 to 100%.

WarpFilter in action: Source grid on left, destination in middle
WarpFilter has a couple of utility methods which allow you to do morphing between two images. This involves calculating the intermediate grid, warping both images from their grids to the intermediate grid and then cross-dissolving the two resulting images. To make this easier, there is a class Morph which has a main program taking two arguments- the filenames of the two images. Running this shows a window which allows you to play with the filter, changing the positions of grid points and the proportion of warp. It will also allow you to produce tiled animations of the warp. This is very much work in progress and I expect to improve this interface and make it more robust as time goes on.
RotateFilter
This filter rotates an image about a given angle. The resulting image will generally be larger than the original and the extra area will be made transparent unless edge wrapping is turned on. A related filter, RotateInPlaceFilter will rotate an image about its centre without enlarging it. This is useful for creating rotated forms of games sprites.
ShearFilter
This filter shears an image by given X and Y angles. Like the RotateFilter, the resulting image will be larger than the original unless edge wrapping is turned on.

ShearFilter (resize = false)
- boolean Resize - true if the output image should expand to fit, false to keep the input size
- float XAngle - The angle of shear in the X direction, in radians
- float YAngle - The angle of shear in the Y direction, in radians
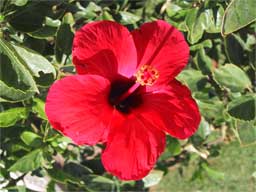
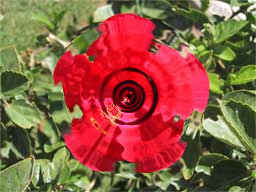
DisplaceFilter
DisplaceFilter distorts an image using a displacement map. The displacement map is a grayscale image whose gradient at each point is used to displace pixels in the source image. This gives the impression of viewing the image through a variable-thickness sheet of glass. For example, if we apply this displacement map to our flower image:

A Displacement Map
We get this:

The Displaced Flower
You can get all sorts of weird effects with this filter. It's especially good for frosted-glass effects.